On Amazon Web Services (AWS) you can use the Amazon S3 object storage service to host a static website in five simple steps. And I can show you how, c’mon!
What is a Static Website?
In case you wanted to know, a static website is basically an individual webpage that contains fixed content. That is, opposed to a dynamic website, which is interactive. For example it responds to user inputs, and loads data from a database in real-time. Like an interactive application for example. A static website, on the other hand, is more like a printed paper brochure, but on your screen in digital form, displaying the same information to every user.
Maybe I made it sound a little boring? Well, think again! There’s plenty you can make happen when HTML, CSS, and Javascript are involved. Plus, since all the content is fixed, static websites typically load very quickly because there’s no need to fetch large data from a database, or generate pages on the fly. That’s cool!
By using the static website hosting feature on an S3 bucket, I hosted a simple website for zero dollars, leveraging AWS’ “free tier”. And you can too!
Prerequisites
1. AWS Account To get started, you will need an AWS account. If you don’t have one yet, don’t worry, it’s simple and free to create one on aws.amazon.com. You will need a valid credit card for identity verification. This will also be the card that will be charged if you insure any service charges.
2. S3 Bucket If you don’t already have an Amazon S3 bucket configured I have a quick guide on how to create an S3 bucket.
Here are the 5 steps to confirgure your S3 Bucket for website hosting:
1. Name You S3 Bucket
So, before you start hosting your static website from S3, you will need to create the bucket first. The URL assigned to your website on S3 will include the name of your bucket. So consider giving your bucket a unique name that you would want your S3 domain name to include.
For example, if your S3 bucket name is my-very-own-website, your url may look like this http://my-very-own-website.s3-website-us-east-1.amazonaws.com/.
If this S3 website url seems embarrassingly lengthy and rigid, don’t worry, we can get into how to use your own url for a low price, in a later post.
2. Enable Website Hosting
Now that you have a bucket, with the name you wish to use in your S3 website url, let’s get into how you can configure the bucket for static website hosting.
In just a few clicks in the AWS Console, your bucket will be set as a website.
- Select your S3 bucket from the console.
- Click on the “Properties” tab.
- Scroll down to the “Static website hosting” card and click on the “Edit” button.
- Select the “Use this bucket to host a website” option.
- In the “Index document” field, enter the name of the file that you will be uploading as the default homepage. For example, common practice is for that file to be named “index.html”. Enter “index.hmtl”.
- Click on the “Save changes” button.
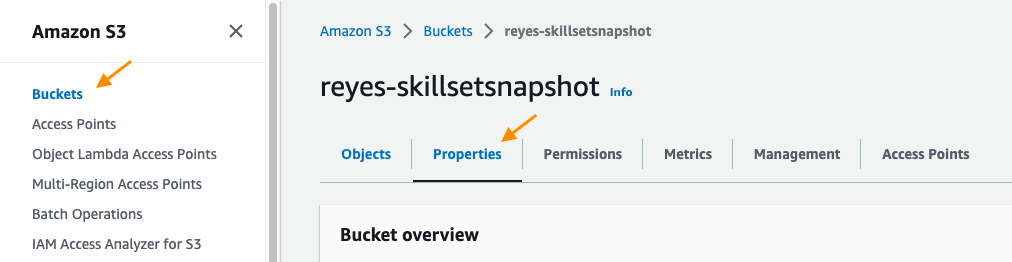
Great! You have enabled your bucket for website hosting. You should now have a bucket website endpoint which you could locate by navigating to Amazon S3 > Buckets. Then, click on your bucket’s name (in blue text), click on the “Properties” tab and scroll all the way down to find the “Static website hosting” card.
Under “Bucket hosting” you will find the link to your bucket.
Now let’s take care of permissions to allow traffic to your index file.
3. Allow Public Access to Your Bucket
By default, all newly created S3 buckets are private. This is an appreciable feature that was implemented in response to company private information being exposed by buckets mistakenly left with public access.
For the purpose of hosting a website for others to visit, however, you will want to grant public read access so that it’s available to anyone on the internet. Otherwise your visitors will reach an error page.
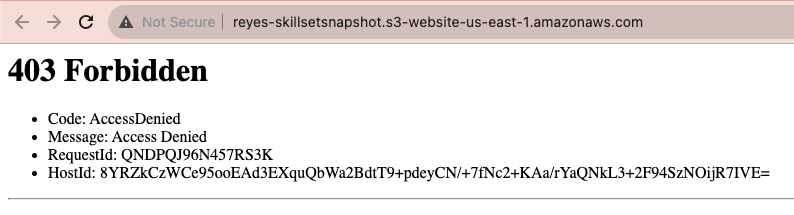
As the bucket owner you will need to make it publicly readable using a bucket policy (or an ACL, though not the suggested method).
You can start by disabling the block public access setting:
Remember, any object (file) in this bucket will become available to the public via the S3 website url. Do not put anything in your publicly accessible bucket that you’re not willing to share with the world.
- Select your S3 bucket from the console.
- Click on the “Permissions” tab.
- Scroll down to the “Block public access” card and click on the “Edit” button.
- Uncheck all options to allow public access to your bucket and its contents.
- Click on the “Save changes” button.
4. Configure Bucket Permissions
To make your static website accessible to everyone on the internet, you will also need to configure your S3 bucket permissions to grant public read access by writing a bucket policy. To do so, follow these steps:
- Select your S3 bucket from the console.
- Click on the “Permissions” tab.
- Scroll down to the “Bucket policy” card and click on the “Edit” button.
- Copy and paste the following bucket policy into the editor, replacing
my-very-own-websitewith your S3 bucket name:{ "Version":"2012-10-17", "Statement":[ { "Sid":"PublicReadGetObject", "Effect":"Allow", "Principal": "*", "Action":["s3:GetObject"], "Resource":["arn:aws:s3:::my-very-own-website/*"] } ] } - Click on the “Save changes” button.
That’s it! Your S3 bucket is now configured to host a static website and allow public access. Now let’s talk about uploading your HTML file to your bucket that will make the content to be displayed.
5. Upload Your HTML Index File
The index document is what is returned when a request is made to your website. In other words, when someone enters your URL in their browser, they are requesting the html file you set in your configurations. Your index file is essentially your webpage.
- Navigate to Amazon S3 > Buckets.
- Click on the bucket name you’re working on (in blue text).
- Click the “Upload” button.
- Drag and drop file or Click “Add files” button and select file from your drive. File should be titled “index.html”.
- Scroll down and click the “Upload” button.
Visit your website at the URL provided
get more info from here https://docs.aws.amazon.com/AmazonS3/latest/userguide/IndexDocumentSupport.html
and here:
https://docs.aws.amazon.com/AmazonS3/latest/userguide/IndexDocumentSupport.html
And there your go! You have static website enabled by Amazon S3. You did that!